Monday, May 16, 2011

Healthy Eating Tips Your Kids Will Love


Every parent wants good things for their children: a positive outlook on life, a healthy respect for authority, a strong sense of self, a disease-free body...a healthy body weight.

Despite our best intentions, a recent report suggests that for the first time in two centuries, the current generation of children may have a shorter life expectancy than their parents.

With all the advances in medicine, how could this possibly be true? The blame falls squarely on today's toxic food environment.

In short, your kids are eating too much junk.

And who can blame them? Junk food tastes great.

The good news is that healthy food also tastes great. Take these simple tips and transform your child's diet into one that is packed with good health.

1) Add Color

Adding bright and colorful fruits and veggies to your child's plate will get their diet on the fast track to health. Fresh fruits and veggies are filled with fiber, vitamins and minerals that are essential to good health.

If your kids are resistant then make it fun. Serve veggies with salad dressing as a dip. Cut fresh fruit in the colors of the rainbow and place them on a skewer. Serve a color themed meal – all green, all red or all orange. Use your imagination and you'll come up with an endless number of ways to make fruits and veggies fun to eat.

2) Think Whole Foods

Processed foods are the biggest problem with our modern diet. Packaged and refined food products are devitalized and filled with empty calories that quickly lead to weight gain. Unfortunately, processed foods make up a large portion of the diet of many children.

Train your kids to opt for whole foods, rather than packaged ones. Whole foods are foods that are in their natural state. An apple. A piece of sprouted grain bread spread with natural peanut butter. A piece of hormone-free chicken. A bowl of beans. You get the idea.

3) Use Wholesome Sweeteners

Refined sugar and corn syrup are packed into many of the foods that your kids love. But wait, there are more wholesome sweeteners available – sweeteners that add vitamins and minerals rather than empty calories. Use the following rather than white sugar or corn syrup:
  • Sucanat: This pure, dried sugar can juice retains its molasses content. Use it to replace white sugar in baking.
  • Pure Maple Syrup: Forget the "fake" syrups containing corn syrup. Pure maple syrup contains potassium, calcium and some amino acids.
  • Brown Rice Syrup: Use this dark syrupy sweetener instead of corn syrup. It takes longer to digest and won't spike your blood sugar like refined sugar.
  • Dates: Throw a few seeded dates into your blender to sweeten your smoothie rather than adding white sugar.

4) Make Smart Substitutions

Kids love pizza and pasta and peanut butter and jelly sandwiches, and that's not going to change any time soon. Rather than fight your kids on their favorites, try making smart substitutions to make their favorites more nutritious.
  • Pizza: Up the nutritional content of your pizza by opting for wheat crust over white, adding veggies to the toppings and sticking with lean meat toppings.
  • Pasta: Use sprouted grain or whole grain pasta rather than traditional white pasta. Add veggies to your pasta sauce. Stick with red sauce, since white sauce is so high in fat.
  • PB&J: A PB&J, made with white bread using sugar-filled peanut butter and corn syrup-filled jelly, is fairly void of any real nutritional value. Try the PB&J Makeover recipe below instead for a sandwich that will provide real wholesome fuel for your child's day.

5) Ban Sugary Drinks

One of the best things that you can do for your child's good health is to instill in them a love for water rather than sugary drinks. Soda pop and juices are filled with empty calories that encourage weight gain.

The easiest way to do this is to stock your house with lots of pure, filtered water. Don't have fruit drinks or soda pop readily available so that they grow accustom to drinking only water.

While I presented these tips as improvements to be made to your child's diets, these tips will also do wonders for your diet. Try these 5 tips out for 30 days and I guarantee you'll look and feel better.

Parents all want good things for their children. Now how about doing something good for yourself as well? You are your child's biggest role model on how to live, for better or worse.

Treat yourself right by calling or emailing today to get started on an exercise program that will change your life for the best.
Pay Attention
Here's a tip for kids and adults alike. When you are eating, pay attention.

Sounds simple, but how often do you snack in front of the T.V. or eat your dinner while in rush hour traffic?

Paying attention means eating when you are hungry and stopping when you are full. It means never eating just to eat, but rather because your body needs it.

Do this and you will quickly reach your ideal weight.
PB&J Makeover
Not all PB$J sandwiches were created nutritionally equal. It all depends on the quality of the ingredients that you use.

If you use white bread, corn syrup-filled peanut butter and refined sugar-filled jelly, the result would be a sandwich that will skyrocket your blood sugar, promotes fat storage and leaves you feeling hungry a short time later.

However, if you make this recipe, with sprouted grain bread, true peanut butter made from one ingredient: peanuts, and fruit preserves that are naturally sweetened with fruit juice rather than sugar, then the result would be a nutritionally dense food that would promote stable blood sugar levels and provide you with hours of sustained energy.

Your kids will love the fun twist of having their sandwich grilled and stuffed with banana slices!

Servings: 1 Here's what you need:
  • Sprouted grain bread
  • 1 Tablespoon pure peanut butter (no added sugar or corn syrup)
  • 1 Tablespoon natural fruit spread (no added sugar or corn syrup)
  • 1/2 of a banana, sliced
  1. Spread one piece of bread with peanut butter and the other with fruit spread. Line one side with the sliced bananas and sandwich it.
  2. In a grill pan over medium heat, grill each side until grill marks appear and the sandwich is warmed.
Nutritional Analysis: One serving equals: 380 calories, 8.7g fat, 53g carbohydrate, 9g fiber, and 13.2g protein.

Spread the word. Forward this newsletter to your friends, family and co-workers by using the "refer a friend" link below.

Wednesday, May 11, 2011

Baked Barley Casserole with Mushroom & Squash Slightly crunchy with a mild nutty flavor, pearl barley cooks more quickly than the hulled variety while retaining its high-fiber, low-cholesterol benefits.

Serves: 6
Hands-on time: 15 minutes
Total time: 1 hour
CATEGORY:
Vegetarian, Freezable

INGREDIENTS:

  • 1 tbsp plus
  • 1 tsp olive oil, divided
  • 8 oz mixed wild mushrooms (shiitake, oyster, cremini), sliced (about 3 1/2 cups)
  • 1/4 tsp sea salt
  • 5 oz butternut squash, peeled and cut into 1/4-inch dice (about 1 cup)
  • 1/3 cup diced leeks, white and light green parts only
  • 1 stalk celery, finely diced (about 1/2 cup)
  • 1 cup uncooked pearl barley
  • 1 clove garlic, minced
  • 3 1/2 cups low-fat, low-sodium vegetable or chicken broth
  • 2 tbsp chopped fresh parsley
  • 1 tbsp chopped thyme leaves
  • 1/2 cup raw pumpkin seeds
  • 1 1/2 oz soft goat cheese, crumbled

INSTRUCTIONS:

  1. Preheat oven to 400°F.
  2. Heat 1 tbsp oil in a large nonstick skillet or Dutch oven over medium-high heat. Add mushrooms and salt and cook, stirring often, until mushrooms begin to release their moisture, about 2 minutes. Add squash, leeks, celery and remaining 1 tsp oil and continue to cook, stirring, until mushrooms are brown and squash is tender, about 4 minutes. Add barley and garlic and stir until thoroughly coated and slightly toasted, about 1 minute. Add broth, parsley and thyme and stir.
  3. Transfer mixture to an 11-cup (2.6 L) casserole dish, cover with aluminum foil and bake in oven until barley is tender and liquid has been absorbed, about 35 minutes. Remove foil, sprinkle with pumpkin seeds and cheese and return to oven. Bake, uncovered, until seeds are toasted and cheese is softened, about 10 minutes.
Nutrients per 8-oz serving (using vegetable broth): Calories: 232, Total Fat: 6 g, Sat. Fat: 2 g, Carbs: 37 g, Fiber: 7 g, Sugars: 3 g, Protein: 7 g, Sodium: 208 mg, Cholesterol: 3 mg

Sunday, May 8, 2011

Cable Built: 8 Moves For Massive Muscle

By: Jessie Pavelka In my many years as a health-and-wellness expert, I've come across a lot of fitness theories. Not many hold up to all the hype surrounding them.
Many people swear by free weights, and while it's important to use them as part of your program, cable exercises offer invaluable advantages.
For one, the key to healthy and lean muscle is getting a full range of motion from top to bottom, and cable exercises emphasize full, fluid, and controlled movement for complete muscle development.
Second, cable exercises place less stress and impact on the joints, ligaments, and tendons. This means you can perform the exercises smoothly, efficiently, and consistently-the perfect opportunity to really focus on the muscles and put the mind where the body is.
So it's time to rethink your weight training with 8 cable exercises guaranteed to rock your muscles' world.

It's time to rethink your weight training
+ Click To Enlarge.
It's time to rethink your weight training.

Exercise 1: Time to Flye

It wasn't until I started integrating the cable fly back in 2002 that I began to get more definition and volume in my chest. It came from the stretch and contraction that cables emphasize. Cable flyes challenge the stabilizing muscles more than the dumbbell flye. The cable version also allows me to target my chest at various angles by adjusting my torso. I also experience a better contraction in the center of my chest, leading to greater definition and striations. The best part-a smooth transition from the minor to major pectoral muscle without having to drop 100-pound dumbbells.
Flat Bench Cable Flyes
Enlarge Click Image To Enlarge.
Flat Bench Cable Flyes
Click Here For A Video Demonstration Of Flat Bench Cable Flyes.

Exercise 2: Complete Your Curl

How do you get that full bicep peak? The answer is a full range of motion from the very top to the very bottom of the curl movement using cables. For me, cable curls isolate a more fluid curling movement and focus on the muscles being used. To really get definition on the biceps, you have to remember that there are multiple parts make up the entire bicep muscle. With cable curls, simply rotating the wrist allows you to achieve a greater contraction and transition from biceps to biceps brachii, and then to the brachioradialis. Though you can rotate similarly with dumbbells, you lose the efficient and fluid movement that cables provide.
Standing Biceps Cable Curl
Enlarge Click Image To Enlarge.
Standing Biceps Cable Curl
Click Here For A Video Demonstration Of Standing Biceps Cable Curl.

Exercise 3: The Total Triceps Extension

Here is where you can use cables to add muscle mass to the back of the arms. Triceps extensions can be done from many different positions using a rope, bent-bar, or straight-bar attachment, but the most important key to results is full range of movement and muscle control.
By doing cable triceps extensions, you not only get full range, but you can also shift the load to different areas of the triceps in a controlled, isolated manner. The cable triceps extension provides more continuous tension to the triceps than with a dumbbell. The result: more volume, definition, and striations in the triceps.
Cable One Arm Tricep Extension
Enlarge Click Image To Enlarge.
Cable One Arm Tricep Extension
Click Here For A Video Demonstration Of Cable One Arm Tricep Extension.

Exercise 4: Chopping Wood with Cables?

This is the real total body exercise, and it's where cables really show their added value. Cable wood chops allow the weight to remain consistent when performing the exercise and take away the jerkiness that can come when using a medicine ball or dumbbells. It also provides more comfort and greater range of motion than the dumbbell, which is very important for optimal results. Your vertebral column will thank you as well!


Exercise 5: Chest Press Performance

Cable chest press is a great alternative to the barbell bench press. The cable version gives you the reins to be in control and rotate the wrist in any direction, so you can recruit more muscle fibers and give the joints and rotator cuff some added strength and stability. The cable chest press stimulates good growth and definition in the chest and allows for an easy transition into other exercises.


Exercise 6: The Shoulder Press on a String

Because of a major shoulder injury, I was forced to start using cables for shoulder press. What I've found is that the cable shoulder press offers more control than free weights. The shoulder and all its corresponding muscles (anterior, medial, and posterior) can be very fragile if put in a compromised position, so being in control of the weight and the movement is crucial.
With a heavy barbell or dumbbells, you can lose control and can risk injury. The risk of injury is also amplified if you have to lift dumbbells from the floor to the starting position. The cable shoulder press allows you to work your delts through a deeper range of motion with minimal risk, increasing shoulder mobility and strength at the same time. The cable shoulder press also challenges the stabilizing muscles more than a barbell or dumbbells. This will strengthen and protect your shoulder joints.


Exercise 7: Kick Your Triceps into High Gear

I was one of those people who had to work their ass off to get good triceps. My Biceps weren't too hard. But triceps? The bane of my existence. But I found that cable kickbacks worked great for adding definition, once I got the volume. You have to remember that the triceps are just like other muscles-they need attacking from different angles. With cables, I was able to do that while maintaining proper form and focus and lifting heavy weight. Most people in the gym use dumbbells for this exercise, but they often lose form and fail to do one of the most important things while doing a triceps kickback - keeping their elbow up and getting full contraction.


Exercise 8: Rethinking the Crunch

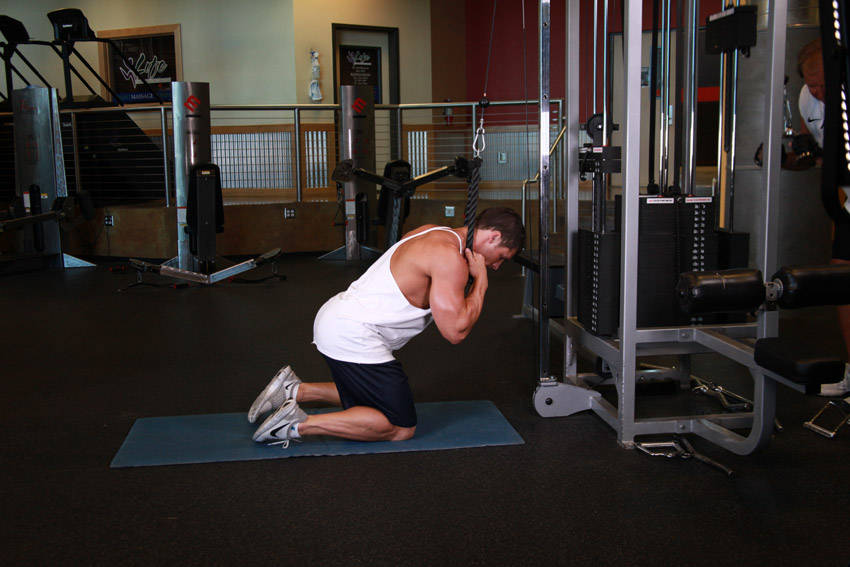
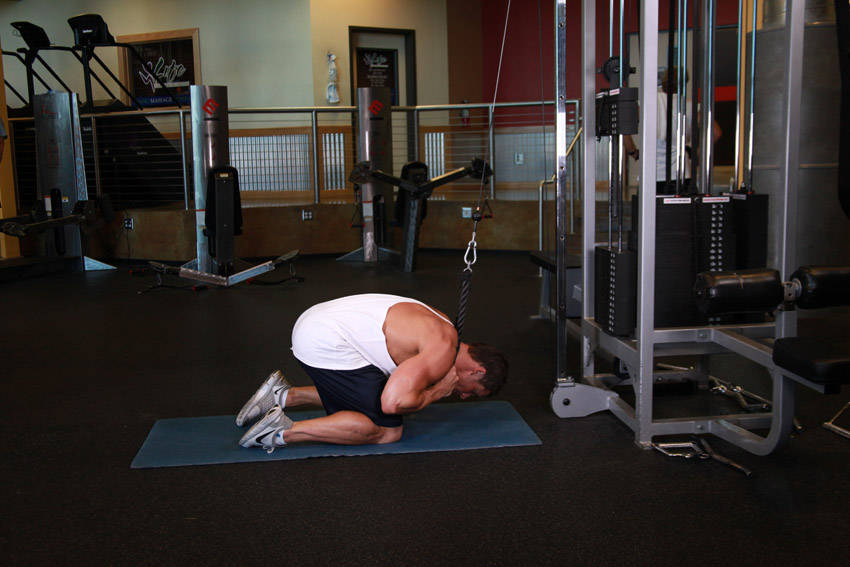
I see so many people doing crunches on the decline bench or the floor, and not exploring the advantages of cable crunches. With cable crunches, you can do them on your knees, while standing, using the decline bench, or while lying on the floor. From your knees or a standing position, you will help take unnecessary stress off the neck and other areas of the body. This will mean consistent resistance, which will give the abs and core smooth and effective exercise. All in all, the cable crunch places more emphasis on the abs than a floor crunch, and allows you a greater range of motion for the best results.
Cable Crunch
Cable Crunch
Enlarge Click Image To Enlarge.
Cable Crunch
Click Here For A Video Demonstration Of Cable Crunch.
Recommended Articles


Share This Article:
Facebook


Recommend this article to a friend by e-mail here!
Back To Jessie Pavelka's Main Page
Back To The Articles Main Page.
Related Articles
Mainstream Muscle: Your Guide To Keeping Fit In The Fast Lane.
More Questions And Answers.
Stand & Be Strong!


Resistance Tube Valeo Resistance Tube

4 Foot Durable Natural Rubber Tubing For Smooth Consistent Stretch!
Learn More!

Monday, May 2, 2011

Mini Quiche's..Quick & Easy Breakfast Quiche This reader came up with an easy morning meal option that's versatile enough to allow you to pop in your own favorite produce.

Serves: 4
Hands-on time:
Total time:
CATEGORY:
Under 45 Minutes, Vegetarian

INGREDIENTS:

  • 2 cups chopped mushrooms
  • 3/4 cup chopped roasted red peppers (from jar), squeezed of liquid
  • 1/2 cup chopped artichoke hearts (in water, not marinated), squeezed of liquid
  • 1/2 cup finely chopped green onions
  • 1 tbsp olive oil
  • Liberal sprinkling herbes de Provence
  • Olive oil cooking spray
  • 6 eggs, lightly beaten (or equivalent egg substitute)
  • 1 1/2 oz goat cheese
  • 1/2 oz grated parmesan

INSTRUCTIONS:

  1. Preheat oven to 350°F.
  2. In a large skillet on medium to medium-high, sauté mushrooms, red peppers, artichoke hearts and onions in olive oil and herbes de Provence until softened and warmed through. Place mixture in a round cake pan, or divide among 4 large ramekins, either misted lightly with cooking spray. Cover with eggs and add goat cheese in small drops before sprinkling with Parmesan.
  3. Cook in oven for 25 minutes or until set. Enjoy or let cool to room temperature, cover and store in fridge. Serve warmed or cold.
Nutrients per serving (quarter of quiche with 1/2 cup vegetables): Calories: 168, Total Fat: 8 g, Sat. Fat: 3 g, Carbs: 7 g, Fiber: 3 g, Sugars: 2 g, Protein: 17 g, Sodium: 367 mg, Cholesterol: 8 mg.

Friday, April 29, 2011

Fruit: Questions and Concerns


When choosing fruit, look for different colors of the rainbow; each color contains different health-protective nutrients.
"I know I should eat more fruit, I just don't do it ..."
"I've stopped drinking orange juice; too much sugar ..."
"Should I buy organically-grown fruit ...?"
Some athletes wisely devour lots of fruit, believing it to be among the healthiest of food choices. But other athletes mistakenly avoid fruit, seeing it as an evil source of sugar and carbs. If you're confused about the role of fruit in your sports diet, keep reading!
Should I eat less fruit to reduce my carb intake?
No! Athletes need carbs to fuel their muscles. Despite popular belief, carbs are not fattening -- excess calories are fattening. Nor do carbs cause diabetes -- lack of exercise and excess body weight are two main contributors to diabetes. Carbs should actually be the foundation of each sports meal and snack.
The carbs in fruit are of two types: sugar and starch. The starch in fruit converts to sugar with ripening. For example:
  • a green banana with some yellow is 80 percent starch and 7 percent sugar.
  • a mostly yellow banana is 25 percent starch and 65 percent sugar.
  • a spotted and specked banana is 5 percent starch and 90 percent sugar.
The sugar in fruit is neither unhealthful nor evil. Unlike refined white sugar, fruit sugar is accompanied by a plethora of health-protective nutrients: vitamin C, folate, potassium, fiber, and phytochemicals that improve healing, aid in recovery after exercise, and reduce the risk of high blood pressure, cancer and constipation. You should eat more fruit, not try to stay away from it!
Is fruit a smart choice for dieters?
Yes, fruit is a smart choice for everyone. Yet, dieters who believe fruit to be "calorie free" fool only themselves. The average piece of fruit from a grocery store is about 100 calories. Eating four or five pieces of fruit a day can easily add 400 to 500 calories to your intake -- healthful calories, but nevertheless, calories you need to count if weight is an issue.
Are some fruits better than others?
All fruits are good for your health, and some are more nutrient-dense than others. Some of the best fruits include oranges/citrus fruits, bananas, melons, berries, kiwi and mango. When choosing fruit, look for different colors of the rainbow: red berries, orange mango, white banana, yellow pineapple, green kiwi ... each color contains different health-protective nutrients.
I've heard today's fruits have less nutritional value?
While some studies have shown a small decline in a few of the nutrients in today's produce, the overall picture shows we have a huge abundance of many varieties of fruits from which to choose. By simply eating an additional piece of fruit, we can more than make up for any possible decline in nutritional value.
How much fruit should I eat?
According to the new Food Pyramid (www.mypyramid.gov), you should target at least two cups of fruits per day. (The old Food Pyramid stated "four servings" but, due to confusion about serving size, the new guide now better defines the appropriate intake: two cups.) You can easily hit this target at breakfast: Enjoy cereal with banana (1 cup) + 8 ounces (1 cup) of orange juice, and voila -- baseline fruit-duty done for the day!
Should I buy organically-grown fruit?
Organically-grown fruits tend to have lower levels of pesticide residues than their conventionally-grown counterparts. Be aware some fruits have more pesticides than others (and wash all fruits very well). The safest fruits include banana, mango, papaya, kiwi and pineapple.
The fruits highest in pesticides include apples, cherries, imported grapes, nectarines, peaches, pears, raspberries and strawberries. If you can afford to do so, buy organic versions of these high-pesticide fruits. You'll have to pay more -- perhaps double for strawberries.
Your best bet is to buy organic fruits in season at the local farmers' markets. By doing so, you'll support your local farmers and also pay a reasonable price. Plus, it's nice to meet the people who grow your food.
How can fruit fit into my food budget?
Fresh fruit can be expensive for athletes on a budget. That is, if you need 3,000 calories a day, a 300-calorie snack of apples (three medium/large apples) might cost you about $2, while 300 calories of carbs from pretzels might cost only $0.60. Yet, fruit bargains do exist:
  • Dried fruit. 300 calories (~1/2 cup) of raisins costs about $0.65. Dried fruits are rich in carbs, fiber and potassium.
  • Canned fruit. 300 calories of canned peaches (a 16-oz. can) might cost $1.30. Rest assured, canned fruits retain most of their nutritional value and are known to be low in pesticides.
  • Frozen berries and other fruits. Frozen strawberries are about half the price of fresh ones -- and perfect for smoothies.
  • Bananas. A veritable bargain: 300 calories for about $0.80. If you hesitate to buy bananas because they tend to "go bad on you" before you get around to eating them, take note. You can store bananas in the refrigerator -- the peel will turn black but the banana will stay fresh and fine.
  • Better yet, peel ripe bananas, cut them into chunks, freeze the individual chunks on a flat tray, and then store them in a zip-lock bag in the freezer. Perfect for bite-size, ice-cream-like snacks or smoothies.
How can I get myself to eat more fruit?
  • For many athletes, breakfast is an appealing time to enjoy fruit; cereal topped with banana or berries is an obvious choice.
  • With snacks, some athletes fail to choose fruit because it's "not enough." That is, when you're hungry, 100 calories of an apple doesn't satisfy the appetite. The solution is to enjoy protein-fruit combinations: apple + cheese (lowfat), banana + peanut butter, raisins + nuts.
  • Think smoothies: Blend 1/2 cup of milk or juice, a banana (frozen chunks for a thick and frosty texture), strawberries (frozen) or whatever fruit is around, plus peanut butter, dry milk (for protein), graham crackers, cinnamon, vanilla -- be creative!
  • If you like to stock up on snacks that don't spoil, check out the new Tropicana FruitWise bars made from 99 percent fruit. Handy!
  • For a post-exercise refresher, cut up a juicy, potassium-rich orange -- far healthier than an orange-flavored sports drink.
  • Serve orange sections at your child's soccer game. Today's kids -- as well as adults -- need to be brought back to fruit.

Vitamin C in Commonly Eaten Fruits
The recommended intake (DRI) for vitamin C for women is 75 milligrams (mg) per day, and for men, 90 mg.
Apple, 1 medium 8 mg
Banana, 1 medium 10
Blueberries, 1 cup 20
Cantaloupe, 1 cup 75
Honeydew, 1 cup 45
Kiwi, 1 medium 75
Orange, 1 medium 70
Peach, 1 medium 5
Pear, 1 medium 7
Pineapple, 1 cup 20
Raisins, 1/4 cup 1
Strawberries, 1 cup 80
Sports nutritionist Nancy Clark, M.S., R.D., counsels both casual and competitive athletes in her private practice at Healthworks (            617-383-6100      ), the premier fitness center in Chestnut Hill, MA. Her best-selling Sports Nutrition Guidebook ($23), Food Guide for Marathoners ($20) and The Cyclist's Food Guide ($20) are available at www.nancyclarkrd.com or by sending a check to PO Box 650124, W. Newton MA 02465.

Thursday, April 28, 2011

Health Nut Blueberry Muffins


An awesome healthy alternative to the usual blueberry muffin.

Phil Sabatini performs the Olympic Lifts and Their Derivatives Clean and Jerk

Setup: The clean and jerk starts off like a deadlift but with two key differences: the lifter’s shoulders are directly above the bar rather than in front of it, and the lifter’s hips are parallel to the knees rather than slightly higher than them.
Execution: From that starting position, the lifter uses momentum generated mainly by the legs, hips and lower back to propel the bar high enough to essentially “jump” underneath it, landing in the bottom of a front squat. After squatting the weight up with the bar resting on his front delts and his elbows pointing straight forward, the lifter then dips and drives the weight up just enough to get back under it, this time in a spilt stance with the arms locked out overhead. The lift is complete once the lifter rises out of the split stance by carefully walking each leg in toward a stable standing position.
Snatch
Setup: The start of the snatch is similar to that of the clean, but the overhand grip will be far wider — long-limbed lifters may even hold the bar with their hands flush against the sleeves at either end — resulting in an even lower hip position relative to the knees.
Execution: From there, the lifter uses the same leg, hip and lower-back drive — all while maintaining an upright torso — to propel the bar high enough to explosively jump beneath it with the arms locked out, and the lift is complete once the lifter rises out of the bottom position with what’s essentially an overhead squat. Whereas the clean and jerk incorporates two separate steps, the snatch is one fluid, lightning-quick movement.
Front Squat
Setup: Load a barbell at sternum height — if you’re new to the front squat, start considerably lighter — and step beneath it with your palms facing up, your elbows pointing forward and the bar resting on your front delts and fingertips. (In Olympic lifting, this position is called the “rack.”) Step back and place your feet slightly outside of hip-width apart with your toes angled outward about 20–35 degrees.
Execution: With an upright torso, push your hips backward as you lower to a full-depth position between your heels. Be sure to maintain an exaggerated lordotic (lower spine) arch to combat the natural lumbar flexion (rounding) that occurs in the bottom of a deep squat. From the bottom position, simultaneously extend your knees and hips to rise back to the starting position. Your torso should remain erect throughout.
Expert’s Advice: To ensure that your thighs run parallel to the angle of your feet, force your knees outward as you squat. An overly wide stance will make this thigh angle difficult, and will place unnecessary strain on the inflexible tendons and tissues of the knees.
Overhead Squat
Setup: Place the barbell on your traps as though you’re setting up for a back squat, and take an extremely wide grip, wrapping your thumbs around the bar. If you lack shoulder flexibility, a wider grip will make the move easier, but it will further limit the weight you can use. As with the front squat, your feet should be slightly outside hip width and your toes should be angled slightly outward. Press the bar to an arms-locked position — dip your knees and use some hip drive if the weight’s too heavy — and shrug your shoulders toward your ears.
Execution: Maintaining “active” (shrugged) shoulders and locked elbows throughout the motion, push your hips back and down toward your heels while keeping your thighs in-line with the angle of your feet. Keep an exaggerated spinal arch in the bottom to prevent your back from curving, and press back out of the hole by simultaneously extending your knees and hips. Your torso should remain upright throughout the motion, and the bar should travel in a vertical path directly above the middle of your foot.
Power Clean
Setup: To start from the ground, take a fairly close stance with your heels almost directly beneath your hips and your toes angled outward 5–15 degrees. The bar should be over the balls of your feet and in contact with your shins. Take an overhand grip half a fist width (or slightly more) outside of your shoulders. Maintain an upright torso and straight arms, and lower your hips until they’re parallel to your knees.
Execution: With your torso as erect as possible, explode upward, driving from your quads and hips and keeping the bar as close to your legs as possible. When the bar reaches mid-thigh, violently extend your hips forward and jump from the balls of your feet, propelling the bar to chest level. Once the bar reaches its peak height, receive it by dipping slightly at the knees to get under it, landing in a slightly wider bent-leg stance and catching the bar on your front delts with your palms turned upward. Your gaze should remain straight forward throughout the movement.
Muscle Snatch (from Mid-Hang)
Setup: Stand tall with your feet slightly outside of hip-width apart and your toes angled slightly outward. Hold the bar with a wide-enough overhand grip that it rests at the crease of your thighs when your arms are straight. Keep your arms loose and your elbows turned out from your sides.
Execution: With an arched back, bend slightly forward at your hips before exploding upward onto the balls of your feet, using the drive from your hips to propel the bar above your head. Lead with your elbows, keeping the bar’s path close to your body. As the bar nears your face, flip your writs and rotate your forearms to turn your palms upward. At the top of the motion, retract your shoulder blades, shrug your shoulders and lock out your elbows to secure the bar in the top position.
Push Press
Setup: Stand tall with your heels directly beneath your hips and your feet rotated slightly outward. With a grip just outside shoulder width, hold a barbell across your front delts in the same “rack” position as the front squat, but ensure that it’s firmer in your palms rather than resting in your fingertips. Make sure your shoulder blades are fully retracted.
Execution: While maintaining an erect torso and a forward gaze, dip slightly at your knees and then explode upward, forcefully pressing the bar in a perfectly straight path above your head. Quickly move your head out of the bar’s path and then push it through the “window” created by your locked-out arms in the top position so that the bar is in perfect alignment with your head, shoulders, hips and the center of your feet. 
High Pull (from Mid-Hang)
Setup: Stand with an upright torso and take the same heels-under-hips, toes-angled-outward stance as the power clean and muscle snatch. Hold the bar with an overhand grip slightly outside of shoulder width. Like the clean and snatch, this movement can be performed from the floor, the low-hang (shins) or mid-hang (thighs).
Execution: With an arched back, lean slightly forward and dip slightly at your knees before exploding through your hips onto the balls of your feet, brushing your hips with the bar as it travels. Shrug your shoulders forcefully toward your ears as you pull the bar upward along your body to chest height, leading with your elbows.